Scratch 101: Creating a Confetti Animation

Hello and welcome to Scratch 101! In this tutorial we will be working on creating a confetti animation. 


Finished Product:


Challenge:
Try to understand the logic behind the different commands you drag from the control category.


Graphical Setup:
The graphical template is located here:
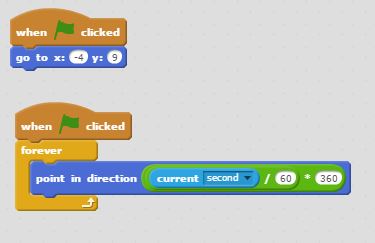

Scripts:

Confetti Animation Script


Common Mistakes:
Make sure that you type in the correct numbers!

Make sure that you have set all of your key commands correctly.


Make sure that you have the if-then containing random7 combined with if-then containing random8.


Abstract Explanation:
This code contains many if-then conditional statements, a random number generator, and a cloning mechanism. This combo allows the program to generate randomly colored squares!


Tip:
Duplicate the if - then statements with the operator in them instead of manually creating each one. This will save time!
Use Turbo Mode when running the program, this will speed up the simulation which creates the confetti effect. 

The completed version can be found here: https://scratch.mit.edu/projects/134341010/

Scratch 101: Creating an Analog Clock

Hello and welcome to Scratch 101! In this tutorial we will be creating an analog clock, which is the classic type of clock found on the wall! If you are new to this display, you can learn here how to read an analog clock. 

Finished Product:

Graphical Setup:
You can find the graphical template here: https://scratch.mit.edu/projects/141448536/

Scripts:
Hour Hand:


 Minute Hand:


 Seconds Hand:


Common Mistakes:
Make sure to organize your scripts correctly! Make sure not to confuse the operations. Order of operations is important, otherwise your clock will not function properly.

Make sure that you put the correct pieces of code in the correct hands, otherwise it will not look the same as the completed version. 

If you find yourself having a problem getting the order of operations, build the script from the block at the back all the way up to the first block in the sequence!

Challenge:
Try and create some extra features for this clock. Have it display the day, month and year using variables. Make sure to check off the checkboxes next to the variables so that they appear on your screen! 

The completed version can be found here: https://scratch.mit.edu/projects/141444786/

Scratch 101: Creating a Paint Program (Part 2)

Hello and welcome to Scratch 101! In this tutorial we will be growing on the work completed in the last tutorial by adding options to the paint program!

Finished Product:

Challenge:
Try and identify the function of each piece of code you write. 

Graphical Setup:
1.) Same as part 1.

The graphical template is located here (contains the scripts from part 1): 
https://scratch.mit.edu/projects/139064516/

Scripts:

Common Mistakes:
Make sure that you type in the correct numbers!

Make sure that you have the correct colors set!

Make sure that you have set and change commands where they need to be!

Make sure that you have set all of your key commands correctly. 

Function of Scripts:
The first piece of code (top-left) is the original piece of code from the last part with a few minor additions, which resets the settings program each time you run it. The second script (top-right), has three separate commands embedded in it. It contains a clear option (which occurs when c is pressed), an option to change pen shade (using the s key), and an option to change your pen size (using the number 1 key). The last piece of the program (bottom-left) allows for you to toggle an eraser, using the e and p keys. The only downside to using the eraser is that all your previous settings are reset, which means that you need to manually switch back to them.  

Tip: 
You could use variables to store the pen size and shade, so that you wouldn't need to manually switch back to your preferred settings each time you used the eraser!

The completed version can be found here: https://scratch.mit.edu/projects/139006611/


Scratch 101: Creating a Paint Program (Part 1)

Hello and Welcome to Scratch 101! In this tutorial we will be creating a painting program. This will allow you to draw on the stage! 

The Finished Project:

Graphical Setup:
1.) Delete the default sprite
2.) Create an empty sprite using the paintbrush

You will find a graphical template for this project here: https://scratch.mit.edu/projects/138943087/

Scripts:

In Sprite1:

Common Mistakes:
Make sure that you are using the 'go to' block instead of the 'point towards' block. 

Tip:
If you would like to change the color of your background, use the graphical features (the paint bucket specifically). 

The completed version can be found here: https://scratch.mit.edu/projects/137924703/#player

You can continue to work on this program in the next lesson located here: