Finished Product:
Challenge:
Try and identify the function of each piece of code you write.
Graphical Setup:
1.) Same as part 1.
The graphical template is located here (contains the scripts from part 1):
https://scratch.mit.edu/projects/139064516/
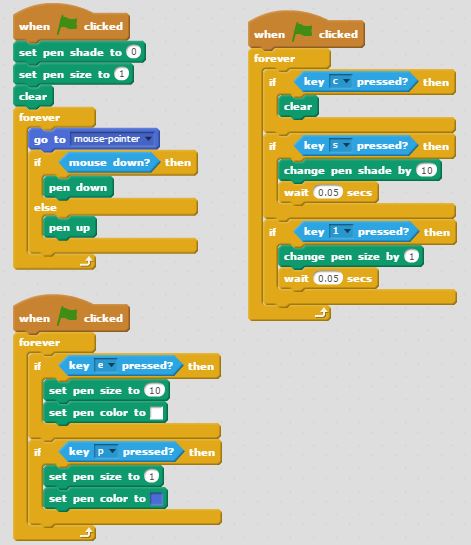
Scripts:
Make sure that you type in the correct numbers!
Make sure that you have the correct colors set!
Make sure that you have set and change commands where they need to be!
Make sure that you have set all of your key commands correctly.
Function of Scripts:
The first piece of code (top-left) is the original piece of code from the last part with a few minor additions, which resets the settings program each time you run it. The second script (top-right), has three separate commands embedded in it. It contains a clear option (which occurs when c is pressed), an option to change pen shade (using the s key), and an option to change your pen size (using the number 1 key). The last piece of the program (bottom-left) allows for you to toggle an eraser, using the e and p keys. The only downside to using the eraser is that all your previous settings are reset, which means that you need to manually switch back to them.
Tip:
You could use variables to store the pen size and shade, so that you wouldn't need to manually switch back to your preferred settings each time you used the eraser!
The completed version can be found here: https://scratch.mit.edu/projects/139006611/
No comments:
Post a Comment